

While Pokemon of course has its own dedicated photography spin-off, taking snaps of your Pokemon is also a vital component of Pokemon Go.
While it’s not exactly the glory of capturing Pokemon in their canonical natural habitat over in Pokemon Snap, taking snapshots in Pokemon Go is a great way to pass the time and inject a little bit of the world of Pokemon Go into the real world – and in addition, taking snapshots is often a key part of certain field research missions or special research missions.
On this page, we quickly explain how to take a snapshot of your Pokemon – both in the wild, and from your friends over in your personal Pokemon storage.
How to take a snapshot in Pokemon Go – in the wild and from your catches
Regardless of why you want to take a snapshot – be it for fun, to fulfill a mission, or just out of experimental curiosity, the method by which you’ll be doing so is the same. It’ll very slightly depending on if you’re talking about a Wild Pokemon or a Pokemon you’ve already caught.
Regardless, the first thing to do is either enter the wild Pokemon encounter or bring up the menu for the caught Pokemon you want to take a snapshot of. That menu looks like this:
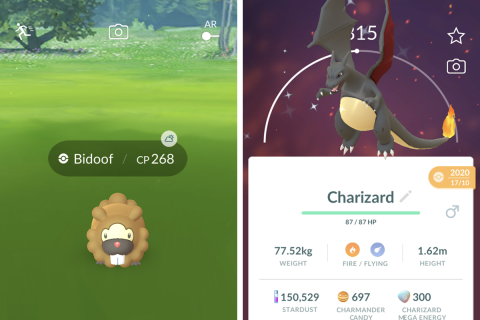
What you’re after here is honestly nice and simple – to take a snapshot, just look for the camera icon. When trying to take a snapshot of a wild Pokemon, this’ll be slap bang in the middle of the screen, as you can see on the left. For Pokemon you’ve already caught, open them up in your Pokemon list and find the camera button on the right-hand side of the screen, just to the right of the CP measurement bar and underneath the favourite button.
You can take photos either in Augmented Reality or just in Pokemon Go’s default backgrounds – though really, unless you’re just taking a photo for the utilitarian reason of snapping one for a mission, you’ll probably want to turn the augmented reality mode on. For that, there’s one additional step.
The camera will switch on, and the game will ask you to pan your phone or other device around so it can read the area around you. Do that, and you’ll eventually notice the following:
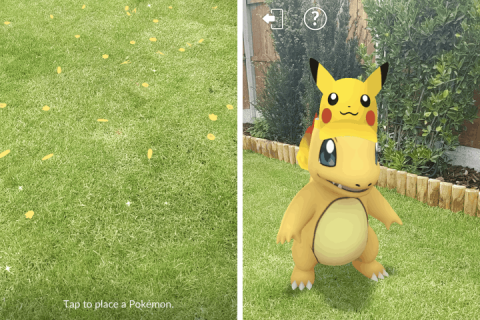
As you pan your camera around, you’ll see little Pokemon footsteps appear on the terrain. These footsteps show the places you can spawn the Pokemon. Keep in mind that size is absolutely a consideration – you’ll need to stand further back from larger Pokemon in order to take a good shot, so you’ll need a more wide open area. Tiny critters you might be able to spawn on your desktop, meanwhile. If you spawn a Pokemon and its placement isn’t right, you can hit the button in the bottom left to recall and deploy them again.
And that’s it! If in AR or not, once you’ve taken a shot, you’ll be able to review those shots as you exit the snapshot mode. Sometimes, other Pokemon will photo bomb your pictures – and sometimes that leads to special Pokemon encounters on the overworld.
You can also take photos of your buddy Pokemon while interacting with them, and use the shared AR experience to take snapshots with the Pokemon trainer avatars of friends and their Pokemon buddies.
The post Pokemon Go: how to take a Snapshot appeared first on VG247.


