
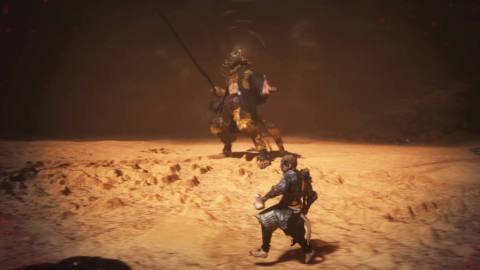
The Yellow Wind Sage is the final boss of chapter 2 in Black Myth: Wukong, and he’s much more difficult than most other bosses in the game. He is a mandatory boss and the gut check between you and chapter 3.
In this Black Myth: Wukong guide, we’ll walk you through how to find the Yellow Wind Sage, when to fight him, and how to take him down.
Where to find the Yellow Wind Sage in Black Myth: Wukong

The Yellow Wind Sage isn’t a boss you can accidentally miss, as you won’t be able to progress the game until you defeat him. However, it’s not entirely clear that you’re walking into a boss arena when you approach him.
There are two shrines close to the Yellow Wind Sage, and you can approach him from either direction. The first is the Windseal Gate Shrine at the Yellow Wind Formation. The Second is the Cellar Shrine in Crouching Tiger Temple. To engage the boss, walk into the massive sandstorm and the cutscene will play.
If you’re struggling to defeat the Yellow Wind Sage, rest at the Cellar Shrine as the run back is a bit shorter.
When to fight the Yellow Wind Sage in Black Myth: Wukong

Unlike the Wandering Wight, you can’t just leave the area and come back when you’re ready to fight. There’s only so much game you can play before you have to defeat the Yellow Wind Sage in order to progress. That said, you can still delay the process as long as possible, ensuring you have plenty of skill and stat upgrades.
The most important thing for you to do before battling the Yellow Wind Sage is unlocking the ability to craft medicine with Xu Dog. Once you’ve completed the first leg of his quest, you’ll be able to craft Celestial Medicines after you reach the Cellar Shrine — which is right near the boss. This can help you dramatically improve your stats, including defense, stamina, health, and mana — all invaluable stats as you head into this boss. You’ll also be able to craft consumables that can help you boost your damage — allowing you to chew through the Yellow Wind Sage’s extremely large health bar even faster — or increase your defense for a short time.
How to beat the Yellow Wind Sage in Black Myth: Wukong
The Yellow Wind Sage will make quick work of you if you can’t dodge his attacks, so let’s start there:
- Staff Spin: The Yellow Wind Sage swings his staff in a half-circle, swings wildly, and then slams it into the sand. This move looks faster than it is. Dodge around the boss’ side, through the swings, to avoid taking damage.
- Sand Forks: The Yellow Wind Sage will lift his staff into the air and slam it into the sand, spear head first. This will deal damage and cause an eruption of forks to shoot out of the sand in front of him. Dodge around to the side when you see him hold his staff up.

- Jumping Stomp: The Yellow Wind Sage can jump into the air and slam his foot down. This deals damage in a small area. The move is pretty quick, but it has a very obvious tell — his feet will completely leave the ground. Just dodge back away from him to avoid getting stomped.
- Disengage: The Yellow Wind Sage will swing his stick down at you as he jumps away. When you’re punishing him, watch for his arm to come down at his side while holding his staff. When it does, back away from him with a dodge and reset.
- Charging Combo: When the Yellow Wind Sage has a bit of distance on you, he’ll step forward with a swing from his staff, do a quick combo in front of him, do a leaping back-handed slam into the sand, and then do another spin when he lands. All of these moves are dodgeable and they have a rhythm to them. Watch for the stick to come toward you and dodge at the last second. Stay close to him and you can punish when the combo ends.

- Wind Slash: The Yellow Wind Sage will swing his stick in front of him, sending out a line of damaging wind in your direction. Wait for the projectile to get close to you and either dodge through it or jump over it. Be aware that sometimes he’ll shoot three at once.
- Storm Spin: Once you get the boss’ health down to about two-thirds, he’ll do a big spin around him that deals damage in an area and summons the storm. These swings are very slow, so just dodge through them.
- Summoned Echoes: The Yellow Wind Sage will occasionally disappear into the storm and send echoes out to fight you. These echoes just do one combo and then leave. Like the boss, you’ll get a feel for these patterns eventually, but watch for the same things as the Yellow Wind Sage: the stick and the feet. You can’t deal any damage to these guys, so just focus on dodging.
- Return Combo: Once both of his echoes have attacked, the Yellow Wind Sage will leap back into the arena with an attack of his own: a delayed stomp. He gives you plenty of warning for this one, so back away if your stamina is low, or dodge through it for a chance to deal some damage after.

- Punt Grab: One of the Yellow Wind Sage’s most devastating and annoying moves is his grab. He’ll deal tons of damage with this move before throwing you back on the ground. To make matters worse, the tell is very subtle, as it starts with a little punt. In the second phase, try to keep an eye on his feet and dodge whenever you see him start to kick out rather than stomp.
- Headless Spear Combo: When the Yellow Wind Sage returns from his adventure in the sands, he’ll be much faster and use his hand to summon pitch fork attacks. The actual combos aren’t that different — stomping with his feet and wide sweeps with the staff — but you’ll be punished more for not dodging through them. Keep an eye on his staff at all times to help you time your dodge.

- Beetle Summon: In the second phase, the Yellow Wind Sage will occasionally scream, causing a massive beetle made of sand to fly out of the ground and body slam you. This thing is super scary and hurts very badly, but the window to dodge it is pretty long. Dodge a little earlier than you think you need to, as the shoulder blade gets close to you.
- Tornado Summon: Once you reach the bottom fourth of his health bar, the Yellow Wind Sage will summon a storm. He’ll stick his staff in the sand for this and start spinning his hands. Take the chance to beat him down while he does this, before the arena gets very unpleasant.
- Final Combo: Once the storm comes, the Yellow Wind Sage will primarily do a combo that involves a lot of sweeping with his stick. The bad news here is that you have very little room to dodge now and he’s much harder to see. The upside is that his glowing spins are visible through the sandstorm, so just do you best to time your dodge.
- Final Summons: As the storm rages on, the Yellow Wind Sage will send in his echoes again, who will do more powerful combos. These can be very hard to see in the sandstorm, so just look for the glow of their sticks to time your dodge.

The Yellow Wind Sage is very aggressive, but his moves are all pretty predictable. However, the boss is grueling for a number of other reasons outside of the raw “difficulty” of the fight.
First, it’s very long, which can make death’s feel even more exhausting than normal.
Second, the boss has multiple phases where you can’t target him for short periods of time, which both elongates the fight and stops you from being able to brute-force the encounter, meaning you must learn his patterns.
Finally, there’s the final phase. As you battle the Yellow Wind Sage, the storm that surrounds the arena shrinks and shrinks. And to make matters worse, the boss will summon several mini tornadoes to spin around the ever-shrinking arena. This often results in you getting juggled by the storm and then bounced into a tornado until you’re dead. The camera doesn’t help either, as it can be extremely difficult to see through the storm in the hectic final moments.
You should get really good at the first three-fourths of the fight so you can save all your tricks (and mana) for the end. Before the Yellow Wind Sage starts summoning storms, he’s just a mildly annoying boss with a lot of health that hits pretty hard. But like we mentioned before, his move set is simple to learn and his tells are pretty obvious. If you’re struggling with this fight, try to get through as much of it as possible without using any spells at all — just you, your stick, and the boss.

Once you can reliably get to the final phase, you’re in business. If you’ve seen the “random bullshit, go!” meme, channel that energy. As soon as he summons the storm, beat on him as much as possible. Eventually he’ll jump out and send his echoes in after you again. This is a great time to use your Transformation spell to give yourself another health bar. You can also chug some Evil Repelling Medicine to help increase your defenses. Once the boss returns, use Immobilize to stun him, summon your clones with Pluck of Many, and use your Spirit Skill to slam him. The goal here isn’t necessarily to be fast — although that helps — but to just use any and all tools you have left to defeat him in his most chaotic moment.
Eventually you’ll either get the hang of this very frustrating dance or you’ll get lucky and get a good pattern in the storm. Either way, remember that a win is a win. Enjoy your new relic, a bunch of great crafting materials, and the new nightmares waiting for you in chapter 3.
Looking for more help on your adventure as the Destined One? Check out our other Black Myth: Wukong guides, which can help you find all three hidden bells in chapter 1, sober up the Yellow-Robed Squire in chapter 2, figure out how to craft medicine, and track down all of Buddha’s Eyeballs.