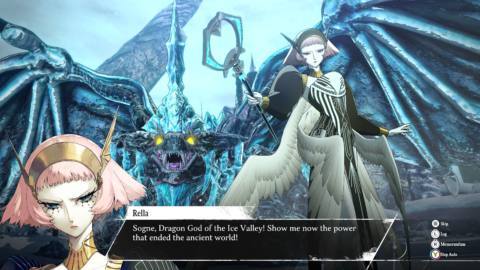
Tough one, huh? If you just got wiped out by a blue dragon, don’t worry—it’s not just you. This is almost certainly the hardest fight you’ll have encountered up until this point in the story. Personally, I’d say Sogne the Icebound is the second hardest boss fight in Metaphor: ReFantazio altogether.
There are stronger, tougher bosses to fight after Sogne, but you’ll be able to tackle those whenever you want. What makes this a particularly challenging fight is that once you reach Sogne, you’re locked in. There’s no opportunity to leave and come back when you’re stronger. Your only way forward, unless you revert to an older save, is to punch straight through this boss.
Also, spoiler alert if you haven’t gotten past the first one yet: This fight has two phases. Thankfully the first phase is much harder than the second, but you’re definitely going to want to retain some MP if you plan to survive the last phase.
You’re going to need some pretty specific skills to get through this fight. If you haven’t equipped them beforehand then don’t worry—just let yourself die and choose to start back at the Gauntlet Runner. From here you can change your party however you see fit. Make sure you also edit your lineup in the party menu beforehand, too, because you won’t have any other chance to do so before accessing the map and starting the fight.
How to defeat Sogne the Icebound and Rella at the Mage Academy
So, Sogne is weak against fire. Problem is, Rella will cast Quartz Wall. This will shield Sogne from any elemental attacks, including fire. Pretty rude. If you use an elemental skill while Quartz Wall is up, it will be blocked and you’ll lose two turns. Really rude.
You might think that means that you shouldn’t use fire attacks at all, but you’re still going to want to equip most of your party with one fire attack for two reasons. Firstly, you’ll want them for the second phase. Secondly, you can sort of use Quartz Wall to your advantage here.
Cast fire at the end of each turn
If you use a fire skill on your last turn, you’ll have only wasted one turn instead of two. More importantly, it will force Rella to recast Quartz Wall next turn. Forcing the boss to waste a turn using Quartz Wall is to your benefit, as basically every other move Sogne and Rella have is way more annoying to counteract.
Use Dekunda to remove debuffs
Other than some fire attacks, there are a few other skills you’re definitely going to want to take into this fight. The most important one is the healer’s Dekunda. Whenever Sogne uses Roar, your attack, defence and hit/evasion will all decrease by two stages. Having less attack and defence sucks, but losing hit/evasion is far more detrimental as attacking and missing will lose you two whole turn icons. Dekunda will remove all debuffs for your entire party, allowing you to get some decent damage in without any fear of missing. It will also usually force Sogne to use Roar again next turn.
Use Dekaja to debuff Sogne
The second most useful one is the Faker’s Dekaja. Sogne will buff itself regularly, increasing its attack to the maximum level. If it hits your party with a multi-targetting move at full strength, you’ll likely lose more than 50% of your entire party’s health in one turn. Cast Dekaja to remove all of its buffs and increase your chances of survival, whilst simultaneously forcing Sogne to waste a turn rebuffing when it attacks.
Buffing your party is pretty much going to be useless here, as Sogne will simply counter all of the hard work spent buffing yourself over multiple turns with Roar. There are two exceptions to this however.
Use the Samurai’s Unwavering Blade and Soul Hacker’s Adventurer’s Curiosity if you have them

If you have the Samurai class unlocked you can use the skill Unwavering Blade. This will increase your hit/evasion to the max for one party member. Although Sogne can and will counter this move with Roar, it’s still extremely useful. If Sogne uses its multi-targeting attack before using Roar, it will likely miss whichever unit used Unwavering Blade. This will cause it to lose two turns. If you’ve previously dealt with Quartz Wall the turn before Sogne misses, Rella will always use it on the final turn the boss has left. Sometimes this will work and sometimes it won’t, but it’s a game-changer when it does.
The second most useful buff you can use is the Soul Hacker’s Adventurer’s Curiosity. This skill raises your entire party’s critical hit rate. The most important thing about this buff is that Sogne’s Roar will not actually counter it, so it’s handy to use on the turns you’re not using Dekaja or Dekunda. On the turns you’re not countering Sogne’s buffs and debuffs, you’re going to want to prioritise using strong physical skills so you can actually start dealing some damage. Adventurer’s Curiosity will help you to occasionally earn some extra turns when you do, allowing you to pile on even more damage.
Use healing items, not healing magic
As far as debuffing Sogne goes, this is also pretty pointless. Rella regularly removes Sogne’s debuffs, which she will definitely have done by the time you’ve gotten around to completely lowering any of its stats. That being said, I still think you should take one in because Rella won’t continue to clear Sogne’s debuffs in the second phase. I would suggest using the Faker’s Sukunda ability here, so you can lower Sogne’s hit/evasion in the second phase.
I would usually suggest some kind of multi-target healing skill in Metaphor, but I don’t think you should use one here. Using your MP on a healing skill isn’t a great idea considering how long this fight will end up being, and you don’t want to waste all of the effort you’ve spent getting through the first phase only to run out of MP partway through the second phase. Instead, take in some Fairy Dust. These items do exactly the same thing as a multi-targeting healing spell. Buy some from a potion shop before the fight if you don’t have any, but make sure you purchase the ones that heal at least 200 HP.
In terms of which attacking skills to take in, just prioritise the strongest physical skills that you have. The warrior/knight archetype skills are great here, as their single-targeting physical attacks do decent damage for a low MP cost. Brawler skills are good too, but the health cost of using them is risky and will just force you to heal more often.
For the first phase, try to keep Sogne and Rella in a loop. Use Dekunda after Sogne uses roar. Use Dekaja when it buffs itself. End every turn with a Fire attack. This causes Sogne and Rella to waste at least two of their three turns either buffing or debuffing and recasting Quartz Wall. This leaves you one or two turns to spend on actually dealing some damage, using any appropriate buffs, and healing. On the turns that you don’t have to use Dekaja, Dekunda, Unwavering Blade/Adventurer’s Curiosity or a healing item, replace these actions with more attacks.
It’ll be a long fight, but you’ll eventually power through. For the second phase, things will be a lot simpler.
Sogne the Icebound phase two
Sogne will no longer be shielded against fire attacks and can no longer clear debuffs, but will still buff its attack. You can still use Dekaja to counter this, but it’s easier to just use Sukunda instead and lower Sogne’s hit/evasion so it misses more often. Otherwise, just spam fire attacks and occasionally heal.
If your MP is getting a little low, use four fire attacks in a row instead of eight and then use regular melee attacks for your next four turns. Remember to reapply Sukunda on the turns that Sogna’s hit/evasion stat flashes. That is really it for the second phase. Getting to this point seems more like a test of resource management than anything, because this phase is extremely straightforward… provided you have enough MP left.


