
With the release of Call of Duty Black Ops: Cold War comes the inexorable pull of zombies – loaded with references, new weapons and, of course, the Easter egg.
Luckily this one is on the easier side than the esoteric secrets we’ve seen in the past, and can be done on your own with just a little skill. For this reason, we’ll tackle this as a solo player but it only gets easier with a full squad.
Loadout and Aetherium
This section will be dedicated to gearing you up beforehand. Aetherium is a valuable part of that process and will come in handy in the final part of the Easter egg. Let’s talk about their use first.
Aetherium is used to upgrade perks, weapon efficiency, weapon mods and field upgrades, with each upgrade taking a total of 6 crystals to complete. They are a key component in keeping you alive just a little longer by doubling the efficiency of some stats and giving new abilities to some of your perks.
There are two central ways of harvesting this precious purple provision. The first is the exfil system.
Every 5 rounds from round ten onwards, you are given the opportunity to use the radio at spawn to get picked up. Doing so will net you some Aetherium. The second way of gaining Aetherium is by simply making your way through rounds.
Every five rounds starting from round 11 grants you a piece of Aetherium – just stocking up with 6 to 12 pieces and upgrading will give you a great benefit for doing the Easter Egg.
Now you’ve gained some Aetherium, it’s time to spend it. For the purpose of this guide, we’re going to give you a loadout and recommend which purchases to make in the map so this will have rather specific upgrades.
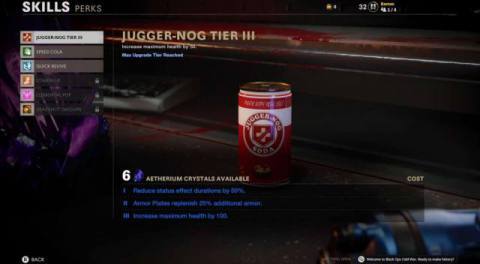
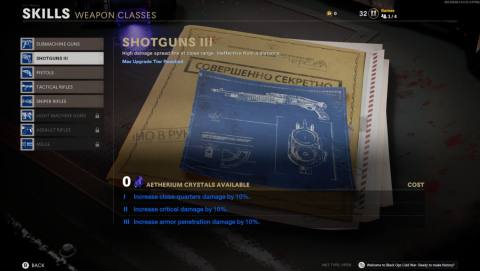
If you want to go for something different, change these recommendations a little bit. If you can, upgrade the Juggernog perk to full to get double the health upgrade you normally would. As well as this, upgrade the Speed Cola and shotgun weapon classes before going in. For your loadout, pick the knife and the Aether Shroud field upgrade.
The reason for the knife is it’s very powerful (a one-shot kill up to round 11) and nets you 115 per kill, twenty higher than a standard non-headshot kill. This is a great source of points, doesn’t require ammo and will be swapped out fairly soon anyway. The Aether Shroud field upgrade makes you temporarily invisible which is great for getting you out of a jam. Once this is done, get in there.
Turning on the power and getting Pack-A-Punch
From the very start, make sure to let the zombies into the map before killing them. This is done to let you pick up supplies they might drop and give you the chance of power-ups. When you stab a zombie and it flashes green, step away from the body so you don’t accidentally pick up a nuke – this will end the round prematurely netting you lost points. Inversely, using the nuke at the very end of the round is a nice way of getting 400 points for free.
After you’ve killed a few zombies and gained a few points, you will probably wonder which way to go. All doors do eventually lead to the power and Pack-A-Punch so it’s not too big of a deal, but going to the left is the most efficient as you will need to open up fewer doors to finish the Easter egg.
From here forward, I’ll use the names of each area. If you are looking to see where that is, it is always located at the top left of the screen.
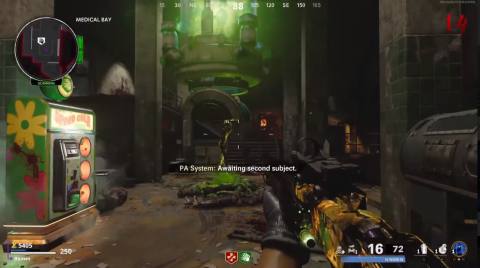
As well as this, the minimap on the top of screenshots should help you with positioning. Move forward through the “Pond”, then the “Tunnels” and down to the “Medical bay” on the left. Move through from here to the “Particle Accelerator” and forward. Turn on the power and interact with the two stabilisers on either side of the room. Don’t worry, they will be indicated with white markers on the screen so they can’t be missed.
After this head to the middle of the “Particle Accelerator” to find a portal. Go through that portal to enter the Aether.
Once in here, head to the surface through the entrance next to the power.
This will land you at spawn where you will have to make your way to the portal indicated on the screen. It will either be at the “Pond” with Quick Revive or the “Crash Site” with Juggernog. Go through to find yourself in one of two locations near the power. Once you land you will find a machine part next to you. Pick it up and bring it to the indicator in the centre of the Particle Accelerator to build the Pack-A-Punch.
Getting the D.I.E Machine
This won’t just address how to get this all-powerful machine, this should cut down some of the fat in doing the Easter egg bit by bit. Whilst getting this machine, we’ll do a couple of things to set you up for later.
If all goes well, you should have the D.I.E Machine by around Round 7 or 8 and can be entirely finished by round 15, making the zombies much more manageable.
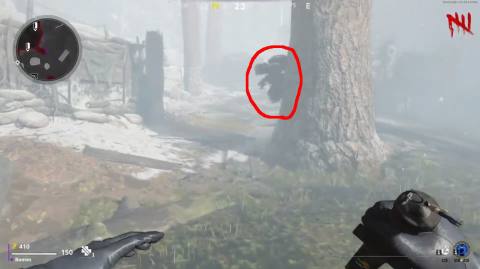
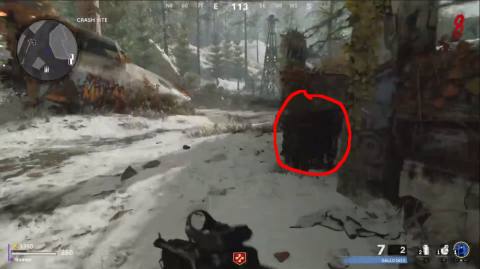
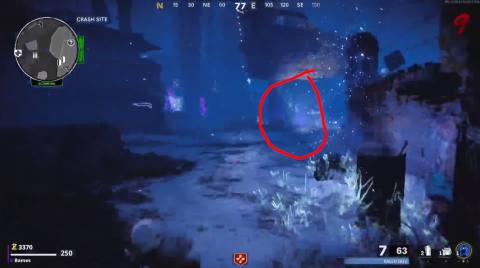
After you turn on the power and activate the Pack-A-Punch, head outside and up to the pond area. If you have points to spare, pick up Juggernog – it might help later on. If not, just hang around Pond and wait for a boss enemy to spawn.
It might take a round or two. After he spawns, get him to hit the tree with the mushroom growing off it with a ranged attack. It should turn it purple. Look at the image underneath to see it.
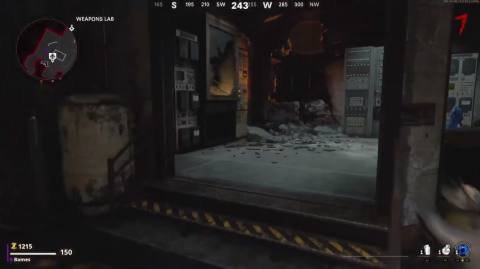
From here, kill the boss zombie and it will split into two. Kill the two zombies and the last one should drop a yellow item called “Keycard”. Head down to the “Weapons Lab” near the Particle Accelerator and use it on the Weapons Locker to get the “D.I.E Remote”.
From here, move down to the “Living Room” inside Nacht Der Untoten. Near the entrance from spawn will be a wall and an unopened door. Move to the side to see a crack and activate the D.I.E. This will suck in zombies that walk across the door but not all of them, so make sure to have them follow you across it a few times. After a certain amount have been sucked up, you can activate the D.I.E from the crack and it will blow open the door. Grab it and keep going forward.
Upgrading the D.I.E Machine
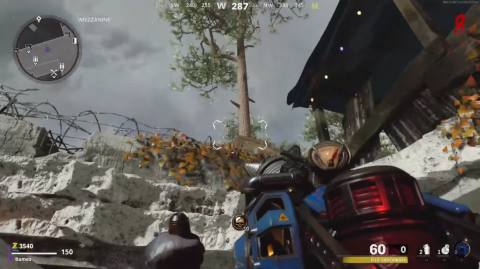
Now that we’ve got the weapon and activated the mushroom, go up to the top of Nacht and shoot at the box on the windowsill and suck the gas canister up form nearby. Look at the images below for the location:
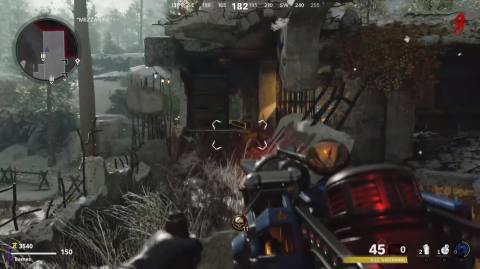
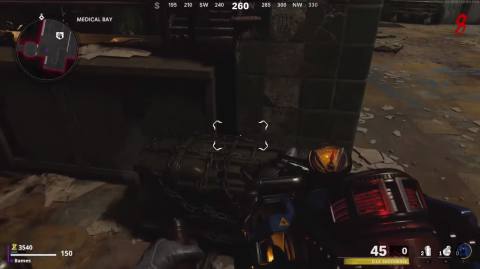
After this, you will find a glass vial down where the box landed, pick that up and place it under the mushroom. While you wait for that, go to where the D.I.E Machine keycard was, go under that and place the bottle in a machine shown in the following image:

From here enter the dark Aether again through a portal (they’re often found randomly so you may have to search around) If you can’t find any, kill a few zombies, look around and you should find one. From here, we are going to build the Aetherscope.
There are three parts to collect and they only appear one at a time. You will have to check all three locations multiple times so, if you’re unlucky, you might have to go through the portal a few times. The first is located in the spawn area near the stairs.
The second is located in the Crash Site on top of a wing and the third is located in the Particle Accelerator up the first flight of stairs near the bottom. Check the image below for their location. After this, go to the workbench in the Particle Accelerator to build it.
Grabbing these pieces will spawn dogs. They are very useful. Kill most but not all of them when you return from the Aether and walk over to the bottle you put into the machine earlier on. Let one jump at you and kill it to suck up the fumes. Collect the bottle afterwards and run out of the room.
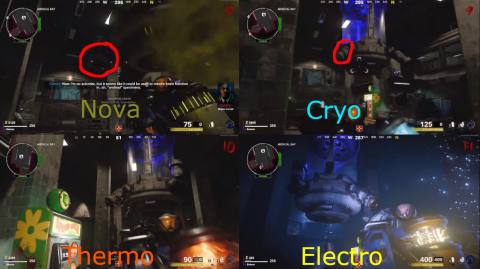
You must place this on a small chest in the Crash Site to upgrade to the nova gas version of the D.I.E Machine. You can only use one at a time but you can swap whenever you want, just make sure you save some ammo for later.
From here, go to the vial you left under the mushroom. Pick it up and bring it to the Medbay near Speed Cola to open up another chest.
This will get you another upgrade for the D.I.E Machine. By this time, you should have a decent amount of points at about round 8 or 9. It might be worth spending them on an upgrade for your gun or perks as well as upgrading other things with your salvage.
I would advise picking the Gallo SA12 off the wall in the Crash Site as its powerful and good for ammo. As well as this, if you see a semtex on the floor by now, grab it and keep it. Now that you have these two upgrades, you have to go ghost hunting.
Who you gonna call?
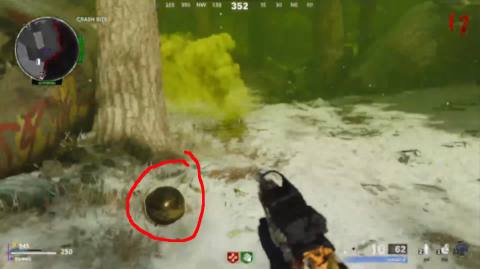
Just before this, go to the Crash Site and find a briefcase underneath it from just right of where you found the Atherscope part earlier on. Shoot it to open it up and find the fuse. There are three places to interact with the Aetherscope.
Go into the Aether and head to the platform above Speed Cola to collect a diary near a computer. Then you have to interact with a glowing orb to the left of Speed Cola. Interacting will summon a man, interact once more to give him a diary. You don’t need to listen to what he says but you can if you want the story.
From here, head out the doors heading towards the tunnel but take a left instead. In this room, there will be another orb. Interact with it, give him the diary and run down to the Particle Accelerator. Near the workbench will be one last orb, interact with it. If you have time in the Aether, go to the fuse from earlier on and the plane will not be floating – grab the fuse.
From here, go back into the Aether and interact with the fuse from earlier in the Crash Site. If you haven’t found it yet, locate it on the image below. The key is you have to use the portal near the fuse and the portal near the pond to complete this step.
Once you have done this, go to the room with the gas canister from earlier on and there should now be a new machine to interact with once in the Aether. Interacting will open up a box on top of a vehicle at Pond.
After this, interact with the computer next to the diary you picked up earlier on. A new portal will open up next to the workbench in the Particle Accelerator. You need to suck in three crystal from around the map whilst in the Aether and shoot them at one box to open it. They can only be seen if you go in that specific Aether portal. If you don’t get them all the first time, go another round or two and it should pop up again.
One can be found at the pond, another at the Crash Site next to the entrance to the tunnels and a third above Nacht Der Untoten. All three of them plus the location of the box (in the Particle Accelerator) can be seen in the image below. Interact with the box to get the fourth upgrade.
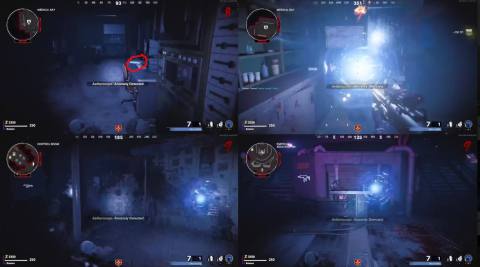
After this, walk back the Medbay near Speed Cola and fire each of the four upgrades at a different nozzle as indicated in the image below. If you successfully hit the right one, it will go – make sure all four are up.
After this is done, enter the Aether again to interact with an orb above Speed Cola. This will give you a brief in-game cutscene. You can wander around but if you stand still and watch, zombies won’t hit – giving some respite. After this is done, they will drop a wrench.
Pick it up, bring it to your spawn and walk up the tank in the Yard. Hit it a couple of times and a zombie will pop out. Kill him and hit the hatch of the tank with a semtex. If done right, the tank will fire and a new object will appear in the Crash Site.
What to do after upgrading
This next step is a little hard but there are tips to make it much easier.
If you can upgrade your weapon by now and give it the brain rot ammo type, this will be easier. Touching the object (just your character model hitting it, not interacting) will spawn a bunch of dogs. Walk up to it, let them spawn, and then take them all out before picking it up. Then you have to bring it to the place where the last cutscene was and slot it into place.
Now, just wait for a boss zombie to appear. Kill it but let its two split mini-bosses follow you. Walk them underneath the chamber you shot the wonder weapon at. From here, go up to computer and activate. This will lock the doors beside you and you will get a cutscene. Crucially, this will spawn in boss zombies and dogs so, the second the doors unlock, get out to the service to kill them all.
You’re nearly at the end of the Easter egg. From here, head down to the Living Room where you will find an Aether portal, go into it and to the corner of Omega Outpost in Nacht. In the corner near the pistol, you will find another orb to interact with for more story.
He will drop a picture that you can interact with when you get brought back to the normal world. Interacting with it will bring you to the boss fight so only do so once you are prepared for it. Before going in, I would make sure your weapons are upgraded, you have the electro D.I.E Machine, you have extra equipment and as many perks as you can. Interact with the picture and good luck.
This boss fight is a tough one and is even tougher as you have to protect the creature you made by combing those minibosses. He will help you to shut down the machine. You simply have to kill every enemy who comes near him as he changes from three spots. Protect him for long enough and you’ve done the fight. Boss enemies drop ammo so using your wonder weapon on them is good as it keeps replenishing what you have. A turret or extra friends makes this easier.
After you’ve done this, make your way to the surface and get on the helicopter. The key is to ignore the shafts of light in your way. One particularly good perk to have for this getaway is Staminup. Luckily this is easier than the previous boss fight. Get her and you’ve finished. Congratulations!
For more Black Ops Cold War secrets, here’s how to decrypt the Operation Chaos floppy disk puzzle. While we’ve also got a page on how to solve the Operation Red Circus puzzle, here.
Or if it’s multiplayer you’re after, here are our picks of the best guns in Black Ops Cold War online.


